As we mentioned in the previous post, there are three major concepts for us to understand about Azure Databricks, Clusters, Code and Data. For this post, we're going to talk about the storage layer underneath Azure Databricks, DBFS. Since Azure Databricks manages Spark clusters, it requires an underlying Hadoop Distributed File System (HDFS). This is exactly what DBFS is. Basically, HDFS is the low cost, fault-tolerant, distributed file system that makes the entire Hadoop ecosystem work. We may dig deeper into HDFS in a later post. For now, you can read more about HDFS here and here.
Let's start by looking at the current DBFS structure.
 |
| Add Data |
 |
| DBFS |
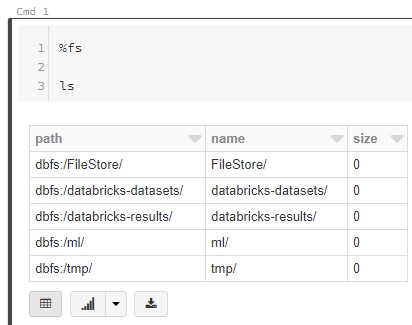 |
| fs ls |
<CODE START>
%fs
ls
<CODE END>
We can use the familiar ls command to see what's in each of these folders.
 |
| FileStore |
<CODE START>
%fs
ls /FileStore/
<CODE END>
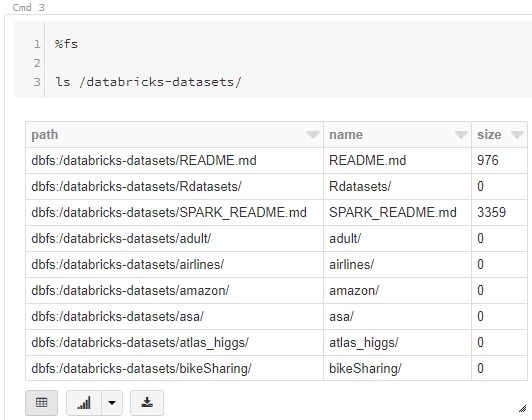 |
| databricks-datasets |
<CODE START>
%fs
ls /databricks-datasets/
<CODE END>
 |
| databricks-results |
<CODE START>
%fs
ls /databricks-results/
<CODE END>
 |
| ml |
<CODE START>
%fs
ls /ml/
<CODE END>
 |
| tmp |
<CODE START>
%fs
ls /tmp/
<CODE END>
Interestingly, there's a level of folders outside of DBFS that can be accessed using %sh commands.
 |
| sh ls |
<CODE START>
%sh
ls /
<CODE END>
Now that we've poked around the folders using ls, let's take a look at the README files we found earlier. To do this, we first need to copy them from the "databricks-datasets" folder to the "FileStore" folder.
 |
| Copy Readme Files |
<CODE START>
%fs
cp /databricks-datasets/README.md /FileStore/readme/README.md
<CODE END>
<CODE START>
%fs
cp /databricks-datasets/SPARK_README.md /FileStore/readme/SPARK_README.md
<CODE END>
After copying the files, they can be downloaded from any web browser using the following format:
https://<INSTANCE>/files/<FILE_PATH>?o=<WORKSPACE_ID>The <FILE_PATH> was decided in our earlier fs command and the <INSTANCE> and <WORKSPACE_ID> can be found in the URL for the Databricks cluster. For instance, our Databricks URL is
https://eastus2.azuredatabricks.net/?o=3558890778145077#This parses to
<INSTANCE> = eastus2.azuredatabricks.netSo, the final URL is
<FILE_PATH> = readme/README.md
<WORKSPACE_ID> = 3558890778145077
https://eastus2.azuredatabricks.net/files/readme/README.md?o=3558890778145077This URL provides a download for the README.md file. Changing <FILE_PATH> to "readme/SPARK_README.md" will yield the SPARK_README.md file. This methodology
The files can be opened in almost any text editor or markdown parser. They contain basic information about Databricks and Spark.
Finally, let's take a look at the production-grade way to work with data in Databricks. We can accomplish this via Mounting. Mounting allows us to reference external file stores, such as Azure Blob Storage, Azure Data Lake Store Gen1 and Azure Data Lake Store Gen2, as if they are part of DBFS. The dbutils.fs.mount() function can accomplish this, with the syntax varying slightly between Scala and Python. In Python, we can use the following command to mount an Azure Blob Storage account:
dbutils.fs.mount(
source = "wasbs://<your-container-name>@<your-storage-account-name>.blob.core.windows.net",
mount_point = "/mnt/<mount-name>",
extra_configs = {"fs.azure.account.key.<your-storage-account-name>.blob.core.windows.net":"<access-key>"})
 |
| Mount Azure Blob Storage |
<CODE START>
#dbutils.fs.mount(
# source = "wasbs://<your-container-name>@<your-storage-account-name>.blob.core.windows.net",
# mount_point = "/mnt/<mount-name>",
# extra_configs = {"fs.azure.account.key.<your-storage-account-name>.blob.core.windows.net":"<access-key>"})
dbutils.fs.mount(
source = "wasbs://blob@breakingbi.blob.core.windows.net",
mount_point = "/mnt/breakingbi",
extra_configs = {"fs.azure.account.key.breakingbi.blob.core.windows.net":"aKNiYJntZUA9asI/uYH1KnB2OzydeD8akiEnhp4s4LKedqXRjNCcQ0aLRYIhMbt/mMEr3sJAmYc1lrCbBeHfIw=="})
<CODE END>
<CODE START>
%fs
ls /mnt/breakingbi
<CODE END>
By looking at the mounted location with ls, we can see the adult.csv file that we placed there. You can read more about mounting at the following links: Azure Blob Storage, Azure Data Lake Store Gen1 and Azure Data Lake Store Gen2. Mounting is especially helpful as it allows us to create SQL tables that sit on top of live data in a mounted external data store, but that's a topic for another day. As a sidenote, access keys and passwords should never be stored as plain text in Notebooks. Instead, Azure Databricks offers a Secrets API backed by Azure Key Vault. We've covered this briefly in a previous post and will likely do so again in more depth.
Hopefully, this post helped unravel a little of what's going on inside the Databricks File System. Leveraging DBFS is critical to creating an efficient, secure, production-quality Databricks environment. The official Azure Databricks DBFS documentation can be found here. Stay tuned for the next post where we'll dig into the SQL Database underlying Azure Databricks. Thanks for reading. We hope you found this informative.
Brad Llewellyn
Service Engineer - FastTrack for Azure
Microsoft
@BreakingBI
www.linkedin.com/in/bradllewellyn
llewellyn.wb@gmail.com
No comments:
Post a Comment